
Free bikes 4 Kids
A great group doing great things in the city of Detroit. it is super easy to get involved just follow the links and see how you can help today. http://fb4kdetroit.org/donate/ or contact Bob directly at bob@fb4kdetroit.org
Mobile Bike Repair Business as a Side Hustle
The mobile bike repair business is a major side hustle opportunity with unlimited growth potential. Here’s how you can get started.

Want to start a mobile bike repair business as a side hustle? The potential is promising.
The side gig economy is growing. Nowadays, it’s becoming harder to find someone who doesn’t have a way to make money on the side. And for those that haven’t yet cashed in on the side hustle era, more than 55% of survey respondents claim they’d love an opportunity to turn a hobby into a revenue stream.

According to recent employment data, only 16% of gigs related to skilled trades (which includes bicycle repair). As more cities promote bike transportation as a greener alternative to cars, this niche is destined for growth and will become increasingly in demand. More than 100 million Americans own bicycles and take a combined four billion leisure and commuting trips each year. And just like cars, bicycles are prone to breakdowns, from flat tires to broken chains to faulty brakes.
If you’re looking for an in-demand side hustle that could potentially become full time income, consider starting a mobile bike repair business. Here’s how:
Invest in the Right Tools
Bicycle repair requires specialized bicycle tools, like T-handle Allen wrenches and pedal wrenches, along with the typical business needs to keep your operation running.
As a mobile repair shop, you’ll have a few extra considerations, such as a portable workspace with good lighting. Some larger operations invest in a van or trailer that’s akin to bringing along an entire workshop. But if you’re just starting out and don’t have that kind of cash to invest, that’s fine too — all you really need is a stocked toolbox, headlamp flashlight, and a couple folding sawhorses and a piece of plywood to create a portable work surface. You might also keep a dropcloth in your arsenal if you don’t have the space for the sawhorses and plywood.
Find Some Practice Clients
Once you’ve honed your skills and have all the tools you need to succeed, start growing your expertise by offering free or trade-for services. Ask your friends with bicycles if you can offer your services to them in exchange for an online review.
The real goal here isn’t just to promote your business, but also get honest feedback from the clients you help so you can improve your services. There’s always room for improvement, and the earlier you work out the kinks in your business, the faster you’ll be able to grow without limits.
Spread the Word
Online reviews can be a powerful form of testimony, with more than 84% of people trusting them just as much as a recommendation from a family member or friend. In addition, 97% of people rely on online reviews for finding out more about local businesses and services, and of those, 93% of people claim that online reviews influence their purchasing decisions.
It’s a start, but don’t rely on them solely to market your business. Invest in some marketing to get the word out faster, such as passing out business cards (perhaps with a discount printed on them?), making flyers, or setting up at events. You might also partner with local bike shop owners to post your promotional material or even get a contract with them for mobile bike repairs.
Gain Ongoing Mobile Bike Repair Business Inspiration
As your mobile bike repair business gains steam, you’ll want to continue finding ways to market yourself and improve your operations. At HomeGrown Cycles, we’re always sharing tips and inspiration to help you run a better business. Check our blog for the latest news and insights on bicycle repair and the industry at large.

How to Start Your Own Mobile Bike Repair Business

How to Start Your Own Mobile Bike Repair Business
Bike repair is a booming industry, so it’s no surprise that many people are looking to start offering this service as a side hustle. If you know a little about bikes and how they work, you’re ahead of the majority of the 100 million bicycle owners in America, many of whom will end up calling you for your repair service.
Here’s a step by step guide on how to start your own mobile bicycle repair business, even if you don’t have much capital or business expertise:
Step 1: Know Your Bicycle Stuff
As the business owner, you need to be the bicycle expert. People are entrusting their passion and safety to you, and you’ve got to be able to figure out problems, detect issues, and do a thorough repair job. Before you start spending money on your business, make sure you’re confident in the art of bike repair. Do some work on your own bike, or ask a local shop if you can apprentice for awhile until you’re confident that this is the business for you.
Step 2: Choose a Business Name
Ready to launch? If you want to be a legitimate business (and you should be), you’ll need to choose a unique business name and register it with the state. You’ll also need a business license from your local municipality, which may cost anywhere from $75 to $250.
Step 3: Make a Minimal Investment
Starting a mobile bicycle repair business means having the right tools and equipment in place so that when your first customer calls, you’ll be able to respond quickly.
Early on, you may want to invest as little as possible to ensure this is something you plan on sticking with. At minimum, you’ll need the following:
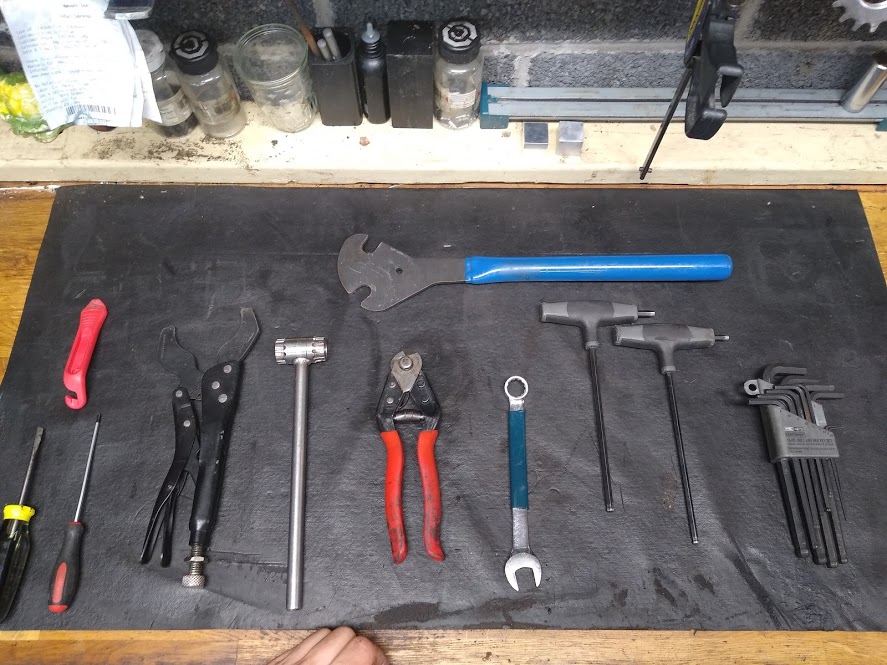
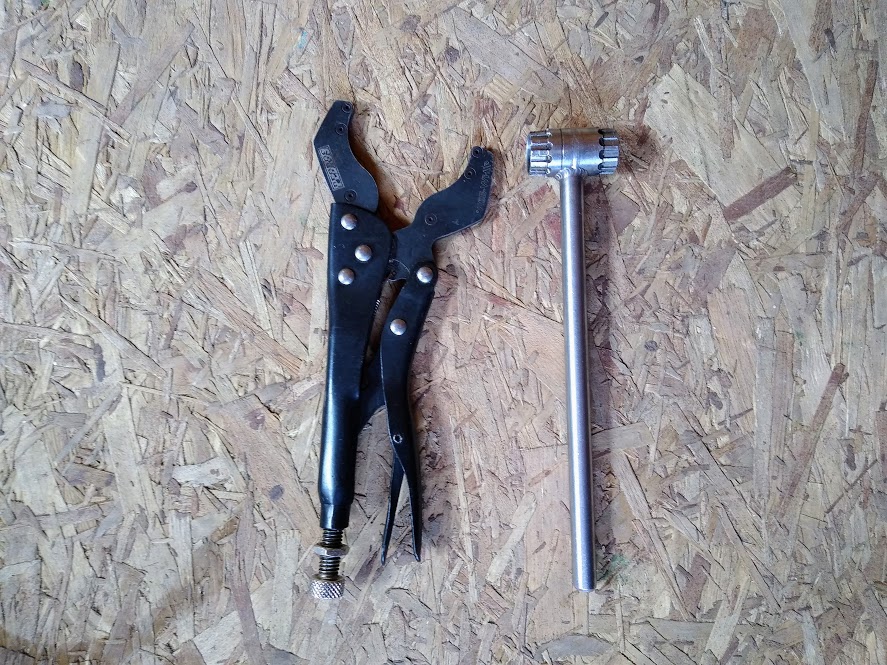
Bicycle tools ( hex keys, wrenches, pliers, ratchets, screwdrivers, cable cutters, tire levers, chain breaker, pressure gauge, etc.)
Accounting software (you can usually get this free online)
Business cards
Working capital to purchase parts
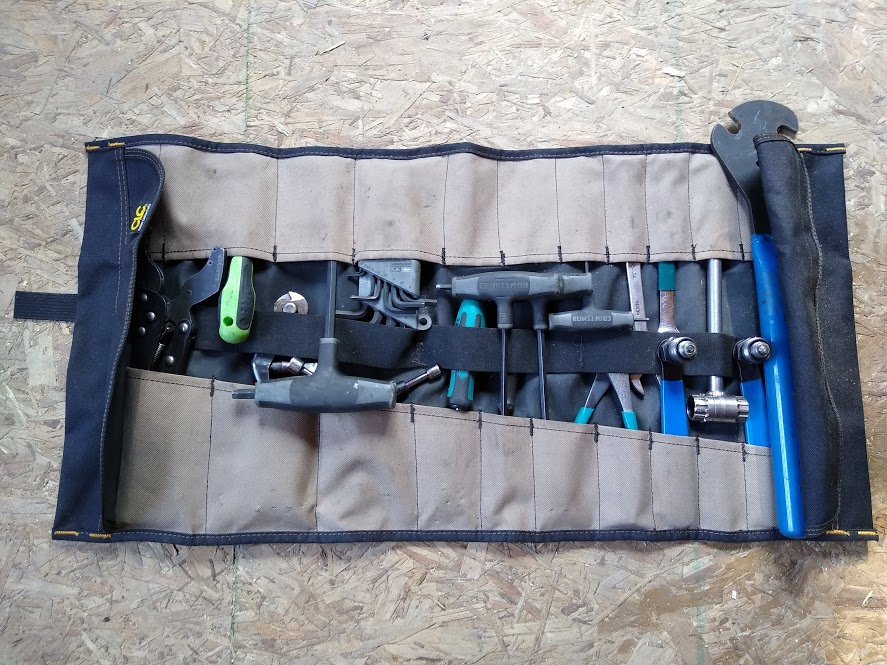
A list of the top 10 tools you will need right away can be found here BICYCLE MECHANIC 7 (8) TOOLS YOU CAN'T LIVE WITHOUT

HGC Mobile repair shop “big yellow”
Some mobile repair shops operate on four wheels (i.e. a truck), while others operate on two wheels (i.e. a bike with a tool trailer). If you decide to get a box truck to double as a workshop, you may be able to get low-cost financing through a credit union.
Step 4: Identify Your Target Market and Spread the Word
Your target is bicycle owners, so think about where you can connect with fellow cyclists who might need your services. Sporting good stores, local bike shops, gyms, athletic clubs, and local organizations are all good places to start connecting with your target market. Pass out business cards like it’s free money and start building word of mouth.
Step 5: Watch Your Profits
After you’ve been in business for awhile, make sure you’re actually making a profit and that the business is worth the time and money you’re spending on it. It’s easy to think you’re making money when people are buying your services, but a solid P&L may prove otherwise. If you find you aren’t generating enough revenue, see what you can do to change that if you want to stick with your business idea.
For more tips and inspiration, head back to the Homegrown Cycles blog!

Bicycle mechanic 7 tools you can't live without
most commonly used tools in the shop
I think most bicycle mechanics will agree that when it comes to tool selection there are a few tools that you just couldn’t be without.
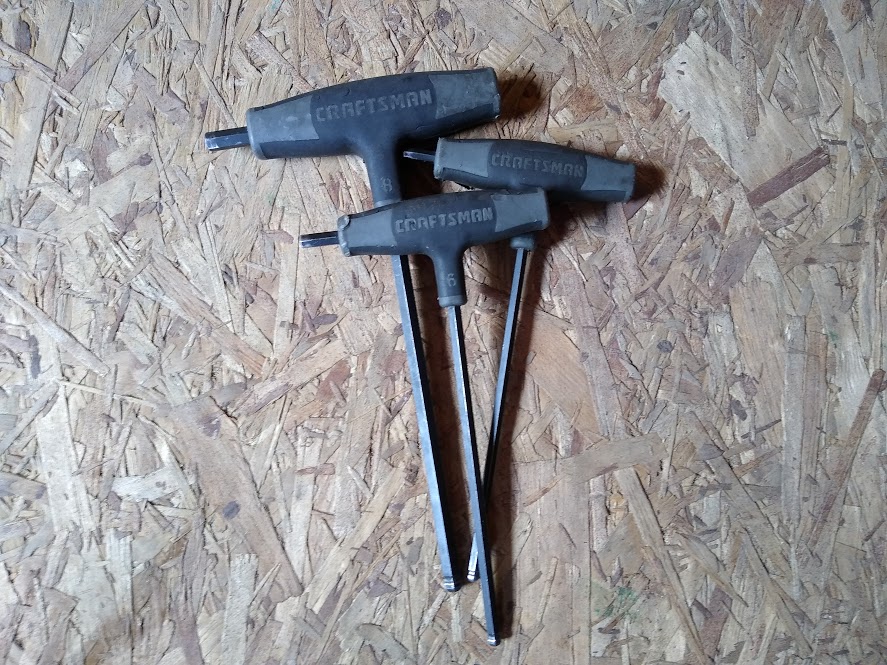
Craftsman metric T handle allen wrench


Park tool Professional pedal wrench

Personally the 4 and 5mm T-handle allen wrench are my most commonly use tool, I wear them out frequently and I only buy these tools if they have a lifetime warranty like Craftsman or snap-on. I have both craftsman and snap on t-handles allens and I prefer the Craftsman because they are a bit shorter and can fit into tighter spots on the bicycle.
Next up (and this is a 2 way tie that I will count as one tool) would be the park tool three way allen and socket wrench for their versatility, convenience, and back pocket feel. They are time savers, the less time you spend reaching for a tool the more productive you can be.
Cassette and freewheel removal tool there are a tone of different versions of this tool I use the park tool FR-1 and the FR-5G these are the budget tools. If i'm looking to save time I use the Abbey bike tools dual sided crombie tool its designed so that you don’t need to remove the quick release from the wheel. Using the crombie tool and the next on the list tool Pedros chain whip you can have a cassette removed in seconds.
The padros vice whip by zinn is the best tool andeveryone on the planet should own one. The vice whip makes removing the cassette fast and no flex like you get from a park chain whip.
A high quality adjustable wrench in 3-4 sizes should be in your shop or garage at all times. They are needed often and the adjustability makes invaluable, also if you need to hammer something you can use the back side in a pinch.
Park tool or Pedros pedal wrench for installing and removing pedals. They are optimized for leverage to remove tough overtightened pedals.
3 way spoke wrench for tensioning and truing wheels of various shapes and sizes is a mush have to keep wheels running straight.
Actually there are 10 tools you should never be without 9. side cutters and 10. cable cutters. side cutters for cutting zip ties down and cable cutters for trimming brake and shift cable.
As far as a tool you don’t really need but makes your life a lot easier go with a park truing stand . if you don’t want to drop $250 on a professional stand find a zip tie and zip it to the chainstay, clip it short with side cutters, and boom truing stand.
Lastly I like to keep my tools with me and transport the often and for that I use a high quality tool roll like the 32 pocket tool roll organizer by rugged tool. This tool roll helps me keep my work space organized and efficient.
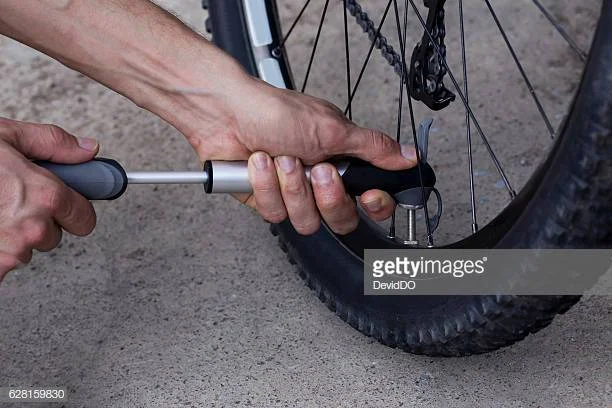
How to fix a flat tire | Bicycle tire repair

Flat tires seem to happen at the worst times; but it doesn’t have to ruin your day or prevent you from starting or continuing your ride. The best way to prevent a bad ride experience is to be prepared! Every bike should have a saddle bag and in it should be a tube, multi tool, tire lever, pump, and tire boot. Links are included for my personal favorite ride kit.
First things first, if the bike has been sitting for an extended period of time, tires may just need to be filled. Tubes leak air, even the new ones, so if they are flat don't assume they are bad. Fill them up, if they hold air overnight you’re probably good.
So, you’ve filled the tire and it doesn’t hold the air. Now you know you have a hole but what to do next? Patch it or completely replace the tube.? Replace the tube! Patches are great if you don’t have a tube and need to get back on the road, but it is a temporary fix. If you need to patch, then use the park tool patches they never let me down. If your tire has a hole in it, replace the tire. If you’re on the road or trail and in a pinch, use a tire boot to cover the hole so the new tube won’t sneak out the hole and blow under pressure.
First thing you will need are a set of quality tire levers NEVER A SCREWDRIVER! I recommend Pedros tire levers because they are tough and less prone to snapping under load. If you don’t have a set of plastic levers, use what you have on hand that will allow you to pry the tire bead from the rim. Use extreme caution when reinstalling the new tube because it is easy to puncture the new tube.
Take the wheel off the bicycle by either loosening the bolts of the axle or opening the quick release lever. Typical axle bolts require a 15mm wrench, but an adjustable wrench will do. Avoid vice grips, channel locks, or anything with a toothed jaw as those tools will strip the flats of the bolt. If your bicycle has V brakes then the cable needs to be removed and the brake opened up. This allows the tire to fit past the brake pads when you install the wheel. Most road bikes will have a side pull caliper brake with a little lever that can be flipped and that will allow a fully inflated tire to easily pass through the pads.
Now you have the wheel off, use the tire lever and slip the smooth end of the lever under where the tire meets the rim. I usually twist or fold the tire to the opposite side of the rim to help loosen the metal bead of the tire and make a little room for the lever to fit under the tire bead. Once the lever is under the metal bead, push the lever all the way around the rim to free up or “unzip” the tire. Once you have one side freed from the rim, some tires will allow you to simply push the other tire bead over the rim; but if it is tight, use the lever and pry it off as necessary.
Tire is off. Great! If you can leave the tube in place inflate the tube with a pump (my go-to pump is the Topeak Joe Blow, it’s an affordable work horse that will last for years) and try and find the hole, this will make it easier if there is something small stuck in the tire. Now that you found the hole, inspect the tire near that location to see if there is road debris that needs to be removed. If you can’t find the hole, leave the tube in place within the tire, remove the tube and run your fingers through tire gently to feel if anything is still stuck in the tire (go slow the object is probably sharp ). Make sure to run your fingers through a few times in both directions, little metal wire has a tendency to lay flat and can easily be missed if your fingers run “with the grain.” Turn the tire around and run your fingers through again and you may find what you missed the first time. Be extremely thorough, visually inspect the tire and feel through every inch until you are confident there is nothing left in the tire. If you inflate your new tube without checking the tire you will most likely have two flat tubes.

hidden problems under the rim strip
Make sure to also check the rubber rim strip that protects the inner tube from the heads of the spoke nipples. If the rubbr rim strip looks old and worn out change it. if you are in a pinch and do not have rim strips laying around a few layers of electrical tape will do the job.
The tire is clear, great! Now check the tire again!! I can’t stress that enough.
Now, inflate new inner tube a little to give it shape and make it easier to install into the tire. I typically align the valve stem with the pressure stamp on the tire, this makes it easier to find how much pressure the tire needs the next time you inflate it.

Hidden piece of glass in tread of tire
With your tube lightly inflated fit it into the tire before mounting the tire on the rim. Pass the valve through the valve stem hole in the wheel and work one side of the tire onto the rim; start with the far side of the tire opposite the valve. Avoid using any tools to install the tire, try to pry the tire onto the rim using your hands as much as possible. If the tire is too tight, then use a tire lever but be careful it is easy to put a hole in the tube at this point. Make sure the tube isn’t getting pinched or sticking outside the rim and tire while you work the tire on all the way around. Install the wheel in the bike frame then pump up the tire. On some bikes you will not be able to get the inflated tire past the caliper brake; so it is best practice to install the wheel then inflate. Watch the tire as you inflate to make sure the bead is seated properly, if the tire starts to come off the rim let the air out fast to avoid blowing out a good tube.
Tire is on. tighten all the bolts or quick release, make sure the wheel is centered in the drop outs, and go ride!